How do you attach a geogrid to a retaining wall?
Below is a detailed explanation of how a Geogrid Retaining Wall is installed. These guidelines are meant to act as a manual and tutorial for properly and successfully implementing a MagnumStone project. The information provided may be used in any way by the user.
There are three better temperatures for MagnumStone: 0 degrees, 2.4 degrees, and 4.5 degrees. For availability, speak with your neighborhood producer.
Each artist has a unique style when it comes to face texturing. Please speak with your local sales agent for further details on the styles that are offered.
For all projects, it is typically advised that the owner of the geogrid retaining wall contact a qualified engineering expert.
Don’t dig until you call us. Most authorities and jurisdictions offer these services without charge. They will visit the location and mark any subsurface facilities.
- Planning for Retaining Wall Geogrid.
- Mark the bottom and top of the ‘retaining wall geogrid’ excavation with pegs or spray paint.
- Establish accurate elevation points at the bottom and top of the wall before you start digging.
- Organic materials shouldn’t be used to fill backfill zones.
- Store and protect high-quality backfill materials from the weather while the building is underway.
Also Read: What are Geosynthetics’ Applications in Civil Engineering?
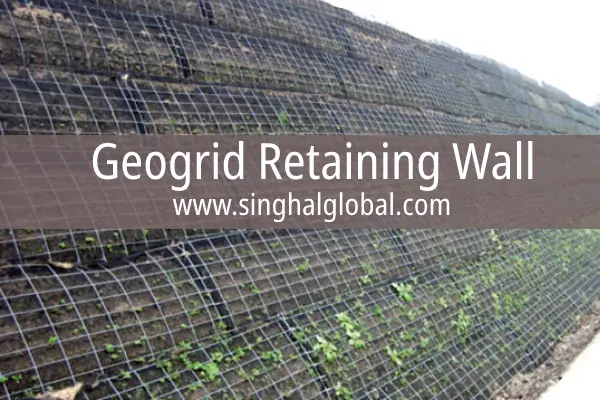
The Geogrid Retaining Wall is a geogrid-based retaining wall.
Excavate and set up a Sub Base Leveling Trench 6 to 8′′ (15 to 20 cm) below the first course. A sturdy 3/4-inch road base will be used to fill this.
In Figure 1, Remove about 6′′ (15 cm) of the base course’s total depth from the front and back to make room for the Leveling Pad Trench. For instance, the MagnumStone Standard Unit is 24′′ + 6′′ (front) + 6′′ (back) totaling 36′′ (61 cm + 15 cm + 15 cm = 91 cm).
For retaining walls, the normal burying or embedment depth ranges from 6′′ to 12′′ (15–30cm), or 10% of the wall’s overall height. Follow the engineers’ cross-section information or design specifications to achieve the proper embedment depth.
Make the cut line deeper and slant it at least two to one.
Sub-base and base stabilization fabrics
Compact Sub Base with at least a 95% Standard Proctor Density
Remove any organic or subpar soils from the Sub Base before compacting and replace them with sufficient reinforced fill materials. lay a leveling pad trench on top of a foundation stabilizing fabric 5 to 6 feet wide. Foundation stabilization fabrics aid in preventing the compaction of the gravel base leveling pad with sub-base materials. The base leveling pad’s fabric also increases the structural bearing stability.
Pad for Leveling Gravel
Typically, 3/4′′ (20mm) road smash gravel or something similar serves as the foundation leveling pad.
Compact Gravel Leveling Pad with a Moisture Balance of 95 percent or higher and a Standard Proctor Density of at least that The gravel’s composition will help to achieve the best possible compaction.
The base must be level from side to side and from front to back. Any imperfections will be accentuated as the wall becomes higher.
Installing the First Course of MagnumStone Retaining Wall Blocks
Put a steel stake at each end of the leveling pad to start building the first course of the units’ rear.
To help you align the backs of each MagnumStoneTM base block, tie a taut string line to the stakes at either end.
The spacing between the steel stakes on the string line may shift as a result of high gusts.
The MagnumStoneTM base blocks that are placed on the leveling pad are not made with SecureLugs.
To prevent disturbing the level gravel, set each unit on top of the leveling pad.
Also read: Before buying Geogrid for construction one must search for answers to these questions.
Refilling the Gravity Retaining Wall is necessary.
A material that has been approved should be used to backfill the MagnumStone blocks. Use a plate vibratory compactor (for smaller lifts) or a roller/vibrating compactor to compact over backfill materials that have the appropriate moisture content.
According to the soil’s characteristics and the size of the compaction machine, backfill in lifts or layers.
Proper compaction is essential to the finished product’s success.
Drain Pipe for Geogrid Retaining Walls
Each Drain Pipe Outlet should be able to receive water due to the slope of a fabric-wrapped or perforated drain pipe.
There may be a drain pipe outlet every 30 or 50 feet.
The sock-wrapped perforated drain pipe can be used in the horizontal cores to help stop debris from settling in the pipe.
gravel installation for drains The vertical and horizontal hollow cores are filled with Clear Crush Drain Gravel once the backfill materials have been spread out and compacted.
The Clear Crush Drain Gravel needs to be 2′′ below the top of the units in order to allow for SecureLug connection.
Compressing Clear Crush Drain Gravel is not required.
Clear the top of the MagnumStoneTM Blocks of all rocks and debris before laying the second course of MagnumStoneTM Blocks.
Make sure the backfill materials are flush with the tops of the units behind the wall.
Make sure the backfill materials are level and crushed as much as you can.
When installing geogrids to retaining walls, cut the geogrid reinforcement material to the length specified in the design. Geogrid lengths and cross-sections of each project are shown.
There are two techniques to create geogrids. Is it mono- or bi-axial? A Uni-axial grid has only one direction of strength, which, during installation, must be perpendicular to the face of the wall. The bi-axial grid can be installed in two different directions: longitudinally (make sure the lengthwise direction is consistent with the Engineer’s design) and perpendicular to the face of the wall.
The project’s success depends on the geogrid’s length, strength, and orientation.
The lengths of each Geogrid should be placed parallel to one another, never overlapping.
The connection between Geogrid and Second Layer
On the MagnumStoneTM units, position the Geogrid as far forward as you can without exposing it to the face.
After half-bonding, the lower units with Geogrid, stack the next course of MagnumStoneTM units on top of them.
The two SecureLugs will securely fit into the hollow cores of the two units below to lock the Geogrid into the gravel core.
The gravel in the bottom units will be recessed by at least 2 inches to make room for the SecureLugs connection.
Complete the Geogrid unit installation. reinforcement of the subjects
Make sure there are no gaps between the unit joints when you assemble each unit against the one next to it.
With the use of stakes or backfill materials, keep the Geogrid taut during backfilling.
It is not advised to operate heavy machines directly on top of Geogrid.
Reinforced Backfill Geogrid Layers
To backfill the Reinforced Zone, place materials from the back of the wall toward the end of the Geogrid.
Drainage gravel should be added to the cores once backfill materials have been laid and compacted.
In no more than 8-inch lifts, install and compress the backfill materials. Consult the compaction equipment for information regarding maximum lift.
Final grading for the installation of geogrid retaining walls
A final grade should be applied to the top and bottom of the retaining wall.
Make sure to prevent soil erosion from newly planted areas during heavy rains or surface runoff.


